Integrating SAP Plant Connectivity with SAP MII and the socket system
by Rackspace Technology Staff
Introduction
This blog describes the SAP© Plant Connectivity (PCo) services and management tools that enable you to integrate with SAP Manufacturing Integration and Intelligence (MII) to create the following elements:
- Connectors
- Communication paths between control systems
- Control devices
- Files
- Historians
- Transmission Control Protocol (TCP) sockets
These days, manufacturing automation software offers fast data exchange between SAP systems and external sources such as programmable logic controller (PLC) controls, plant historian systems, and more. The SAP PCo system is one of the major software applications that SAP introduced to exchange data between SAP Shop Floor and the SAP MII system. SAP PCo delivers the Industrial Internet of Things (IIoT) and machine-to-machine (M2M) connectivity to the business.
SAP PCo is the second generation of the SAP Manufacturing connector technology. It replaces the xMII UDS (Universal Data Server) product that was initially developed by Lighthammer Corp. It increases the value of production data and lets you build smarter products with smarter machines. It distributes manufacturing intelligence across your factory and enterprise with robust
standards-based connectivity.
This post explains the SAP PCo installation and integration with SAP MII and the socket system. It provides step-by-step configuration screenshots of the source and destination systems. It also explores the notification creation process to
let you monitor production facilities, identify undesirable events (such as rule violations or changes in measurement readings), and report them to a destination system.
SAP PCo
This section explores SAP PCo.
Overview
SAP provides a software component that enables the exchange of data between a SAP system and the industry-specific data sources of different manufacturer process control systems such as:
- Plant historian systems
- Supervisory control and data acquisition (SCADA) systems
- Programmable logic controllers (PLCs)
- Statistical Process Control Software (SPC) systems
With PCo, you can receive tags and events from the connected production source systems either automatically or by requesting and forwarding them to the connected SAP systems.
Advantages of a PCo system
- You can quickly configure PCo systems. No additional development is needed to connect production source systems.
- PCo systems communicate with different software systems on the shop floor and connect machines to solutions such as SAP MII, manufacturing execution systems (MES), SAP Extended Warehouse Management (EWM), and more.
- You can configure a PCo system for one or more locations and distribute manufacturing intelligence across your factory and enterprise with robust standards-based connectivity.
The following diagram shows the SAP PCo architecture:

Socket to PCo process
The following sections cover installing and configuring the PCo, based on the
following steps:
- Install the latest PCo version.
- Install key files with the corresponding hardware key.
- In PCo, create a source system, `Socket Agent`.
- In PCo, create an agent instance with the socket agent and specify the IP address with the port number.
- In PCo, create a destination system, `SAP MII`.
- In MII, create a Business Logic Server (BLS) transaction to retrieve data from the source system.
- In PCo, configure the MII BLS transaction path in the PCo MII destination.
Prerequisites
Before starting, consider the following prerequisites:
To find the latest guide, go to the SAP support portal
Then click Download Software and log on. Finally, click Support Packages and Patches -> A-Z Index -> P -> SAP Plant Connectivity -> SAP Plant Connectivity 2.3 -> SAP Plant Connectivity 2.3 -> Win32
Install the SAP PCo system
Before you install the SAP PCo system, you must install Microsoft® .NET Framework version 4.5.2 or later.
Reference this help document for planning, software download, installation, and post-installation assistance
as needed.
The PCo Management Console, shown in the following image, is the WinForms application that provides the configuration and management of the PCo source and destination systems, agent instances, and notifications.
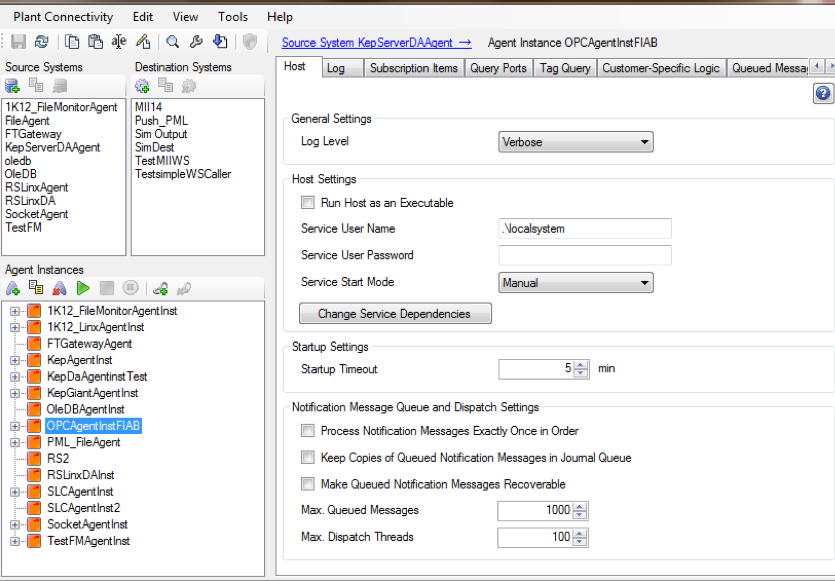
Image Source
Go to
SAP Business Suite Applications -> SAP Manufacturing SAP Plant Connectivity -> SAP Plant Connectivity 15.1.
The following image shows the structure of the connection flow:

Go to SAP Business Suite Applications -> SAP Manufacturing SAP Plant Connectivity -> SAP Plant Connectivity 15.1.
After you install the .NET Framework, use the following steps to install PCo:
1. Install the latest PCo version.
2. Install key files with the corresponding hardware key.
Create the source system
Use the following steps to create the source system:
Set the source system and agent
Click Source System, provide the name, and select the source Agent type (OPC DA, HAD, OLEDB, UA`, or IP21) as Socket Agent as shown in the following screenshot:

Set the socket type
- Choose the socket type, which can be Internet Protocol version 4 (IPv4) or Internet Protocol version 6 (IPv6).
- Enter the name of the connection and the IP address of the socket.
- Enter the port on which the barcode scanner connects.
Set the terminator
Enter the terminator to identify the end of the message in the data stream and provide the length of the message in the data stream as shown in the following image:

In the Reliable Connection tab, set the interval and number of retries if, the connection fails, as shown in the following image:

Create the destination system
Use the following steps to create the destination system:
Set the destination
In the destination, choose the MII destination, enter a name, a description, and click OK.

Select server and MII version
Select the server name, port number, version of MII software, and the user credentials that have the MII admin role access as shown in the following screenshot:

Test the connection
Click Test Connection. If the connection works, the Connection Successful message displays.
Create an agent
Use the following steps to create an agent:
Choose the source system
Choose the barcode source system as source and give the agent name and description.

Select the Bar
In the Subscription Items tab, select Browse at the bottom and select Bar. The Bar Message field is the input parameter name for Bar. The scanned barcode value is retrieved into this parameter.

Set the port and port notification
In Query Ports, select `SAP MII` and give a new port number. Do not use thisport with any other agents. Check other agent instances before assigning it.

Go to the Query Port tab, select the first two options, `MII` and `MII before 12.2`, and then verify that the port number is available. The
default is `9000`. After you create the port, save the agent instance and create a notification for this port.
In destination, click Add Destination, select the destination MII system, and browse to the target transaction.

In Transaction, select the input parameter to receive this barcode message.

Click Save and start the agent instance. After you scan a barcode, PCo gets it and sends it to the MII transaction. In the MII transaction, you can process the input data.
Configure the management host settings for BLS transactions
After you create the source and the destination systems, you need to configure the PCo settings for connecting the MII application menu data server.

The settings in the preceding image describe the system details of the PCo installation. You can use the same information in the SAP MII data server to configure connectivity for the PCo through a URL path.
Use the port number used in the PCo Web Services Description Language (WSDL) URL in the PCo connector.
Create a PCo data server in SAP MII
Use the following steps to create a PCo data server:
Update the hosts file
Before creating the PCo connectivity, you must add the PCo system IP address or host name to the SAP MII server host file, C:\WINDOWS\system32\drivers\etc\hosts.
Go to SAP MII Menu -> Data Services -> Create Data Server as shown in the
following screenshot:

Select the connector type
Select Connector Type from the drop-down menu and enter the server name and description fields.

Fill in the fields as follows:
PCo Mgmt Service URL: https://IP address:Port/PcoManagement
Fill in the administrator credentials of the PCo mchine that you used to create the PCo source.
User ID: PCo machine user ID.
Password: Use the same credentials that you used to create the PCo source.

After you enter the URL path, click Next.. A new window displays for credentials, which should be the PCo Server Windows credentials.

Fetch the agents that you created in the PCo Management Console.

Click Finish and then check the Enabled check box as shown in the following screenshot:

After the connection is successful, fill out the fields, as shown in the following
screenshot:


In the Status tab, the Status parameter should have a green Running value.

Create SAP PCo notifications
The notification process enables you to monitor production facilities and to record any sudden, undesirable events and report them to a destination system. However, you can also use this process to record the frequently occurring desirable events such as confirmations.
Configure PCO notification with an agent
After you create the agent, right-click the agent in the list and select Add Notification

.Enter the name and description and click OK

Select the Subscription Items tab and create a notification based on the trigger condition.

The notification is active as soon as you create it.
Conclusion
The SAP PCo system offers a fast data exchange between SAP systems and external sources such as PLC controls, plant historian systems, SPC software, and more.
You can configure it quickly with no additional development needed, and you can easily connect source systems in your production system. PCo can communicate with different software systems on the shop floor.

Recent Posts
7 Critical AWS Architecture Risks: How to Assess and Remediate Security Gaps
Setembro 12th, 2025
From Data Rich to Insight Rich: A Cloud Charter for 2025
Setembro 1st, 2025
Dimensionar personalizações da zona de aterragem no AWS
Maio 1st, 2025
Relatório sobre o estado da nuvem em 2025
Janeiro 10th, 2025